Registration
You need to register on the WAY web page to get an ID number. Keep in mind your ID and your password.
First time you start the program
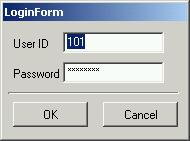 When
you start the program for the first time, it will ask you for your login
ID and password. It saves the ID and password in a file so you won't need
to enter them again later.
When
you start the program for the first time, it will ask you for your login
ID and password. It saves the ID and password in a file so you won't need
to enter them again later.
You need to verify the connection settings. The default server name when
the program starts the first time is blarney.it.uu.se and the
default port numbere is 6713. Check on the WAY
web page to verify the server information.
Then you can login changing your status. Since it is the first time, you
won't have any contact, and any group. The first thing to do is to add
a group, because you need at least one group to be able to add contacts.
Menu
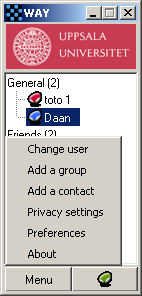 You
can change the current user with "Change user".
You
can change the current user with "Change user".
You can add a group to your contact list.
You can search and add new contacts in your contact list.
You can edit your privacy settings.
You can change the server configuration for the connection.
You can see some information in the about dialog.
Connection to the server
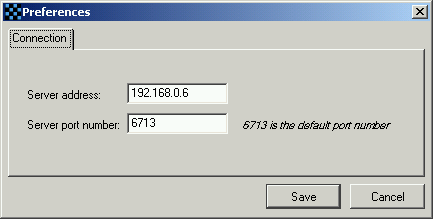 You
can change the server settings: server address, and server port. The settings
are always available on the WAY
web page under the section "Server Info".
You
can change the server settings: server address, and server port. The settings
are always available on the WAY
web page under the section "Server Info".
You can also see if the server is running ;-).
Status
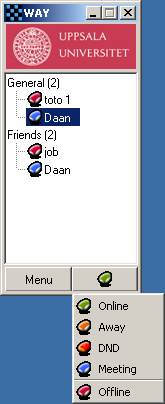 When
you click on the status button, this is the list that appears. You can
choose one of the first four status to login. Or you can choose "Offline"
to logout.
When
you click on the status button, this is the list that appears. You can
choose one of the first four status to login. Or you can choose "Offline"
to logout.
If your status does not change, that means that you cannot connect to
the server. Check the connection settings in "Preferences",
and the web page to see if the server
is running.
Logout
To
logout, just select "Offline", or close the program.
Add a group
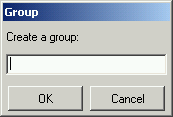 You
can add a group to your contact list. Just enter your group's name. The
group will be only displayed when the user has granted the new group.
PLEASE DON'T USE SPECIAL CHARACTERS LIKE Å, Ä, Ö,
É, È, ... There is a problem with this kind of
characters. You might not see your group's name even if it is on your
list.
You
can add a group to your contact list. Just enter your group's name. The
group will be only displayed when the user has granted the new group.
PLEASE DON'T USE SPECIAL CHARACTERS LIKE Å, Ä, Ö,
É, È, ... There is a problem with this kind of
characters. You might not see your group's name even if it is on your
list.
Action on a group
![]() If
you right-click on a group, you will see this menu. You can then rename
the group, or delete it with all the contact that it contains.
If
you right-click on a group, you will see this menu. You can then rename
the group, or delete it with all the contact that it contains.
Add a contact
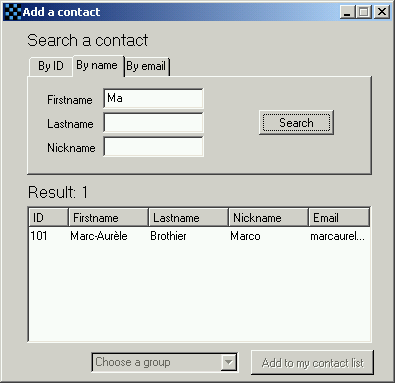 To
search and add new contacts: "Menu" -> "Add a contact"
to display this window.
To
search and add new contacts: "Menu" -> "Add a contact"
to display this window.
You can search a contact with its ID, or firstname, lastname, nickname,
or email address. If you don't enter anything, it will be like a "*".
You will get back all the registered users.
To add a contact in your contact list, select one contact in the result
list, choose a group from the combobox near the button "Add to my
contact lists", and then click on the button "Add to my contact
list". The contact will be added to your list without any notification.
You cannot add a contact to your list that you already have in your contact
list. See "action on a contact" to copy, move, delete a contact.
Action on a contact
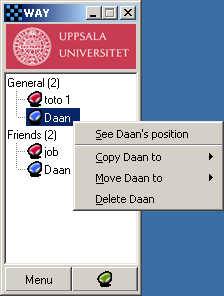 If
you right-click on a contact, this menu will appear. If you double-click
on a contact, the first action "See my contact's position" will
be executed.
If
you right-click on a contact, this menu will appear. If you double-click
on a contact, the first action "See my contact's position" will
be executed.
With this menu, you can copy the contact in another group, usefull for
the privacy settings, or you can move the contact to another group.
You can also delete the contact from the group, or from your contact lists
if it is the only group where is the contact.
Change the user
You
can change the current user. The login window with the current user information
will be displayed. Just enter your new ID and password, and click "OK"
to save them.
Privacy settings
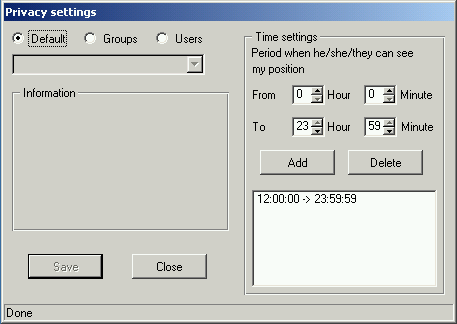 There
are 3 differents settings: Default, Groups, Users.
They all have a different level of action, the finest is Users,
and the more general is Default. They define day periods when
other users can see your position with your information (ID, nickname,
email). When an user has a floor map, he/she will have a green point if
you allow him/her to see your position with your information and if he/she
has you in his/her contact list, or a red point that will be anonymous
(without any information available to know who is located at this position)
if you don't allow him/her to see your position with information, or if
he/she does not have you in his/her contact list.
There
are 3 differents settings: Default, Groups, Users.
They all have a different level of action, the finest is Users,
and the more general is Default. They define day periods when
other users can see your position with your information (ID, nickname,
email). When an user has a floor map, he/she will have a green point if
you allow him/her to see your position with your information and if he/she
has you in his/her contact list, or a red point that will be anonymous
(without any information available to know who is located at this position)
if you don't allow him/her to see your position with information, or if
he/she does not have you in his/her contact list.
Default: when selected, you can add and remove day periods when everyone can see your position with your information, even users that you don't have in your contact list. The default setting is 00:00:00 -> 23:59:59. It means all the time. Now, for the rest of the explanation, lets suppose that your settings are 14:00:00 -> 18:00:00.
Groups: when selected, you need to select one of your
group. For this group you can specify day periods when contacts in this
group can get your position even if your Default settings prevent
anyone to see your position. If for the group "General" you
set 10:00:00 -> 17:15:00, then a contact in the group "General"
will be able to see your position and information between 10:00:00 and
18:00:00, because you have allowed everyone to see your position between
14:00:00 and 18:00:00.
Defining other day periods in the groups, means to add extra periods for
people in these groups than periods available for everyone, Default.
Users: when selected, you need to select one of your contact. You can allow to a specific contact extra day periods to see your position. Suppose that for "Tom" your settings are "00:00:00" -> "23:59:59", then Tom will be able to see your position all the time.
For a contact X in your the group Y, to be able to see your position with your contact information, the following needs to be true: YOU are in X's contact list AND actual day time IS IN "periods Users X" OR "periods Groups Y" OR "periods Default". If the contact X is in more than one group, we add also the other groups periods.
You cannot hide your position when you are connected, but you can be anonymous.
See the position of a contact
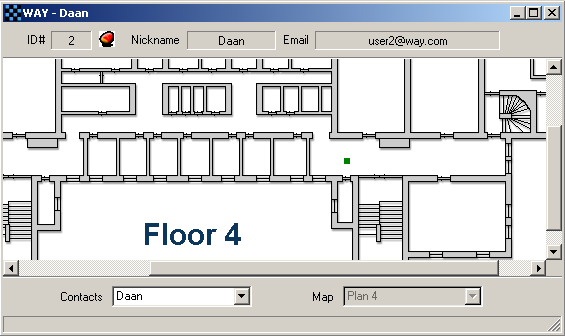 When
you double-click on a contact, this windowd appears to show you the contact
position with a green square
When
you double-click on a contact, this windowd appears to show you the contact
position with a green square ![]() .
You don't need to click on another contact on you contact list to see
his/her position, but you can select a contact from the combobox "Contacts".
.
You don't need to click on another contact on you contact list to see
his/her position, but you can select a contact from the combobox "Contacts".
See the position of all users on a map
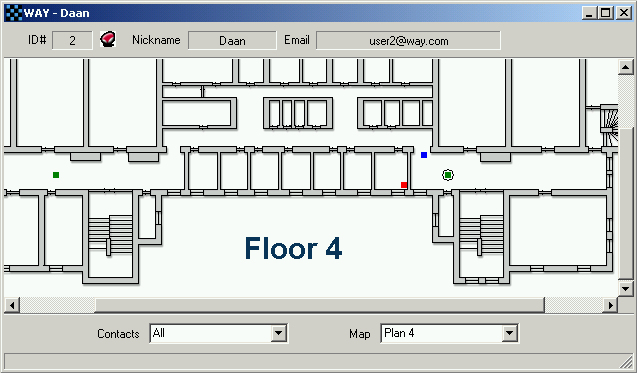 One
choice in the contacts combobox is called "All". It means that
you can see the position of all the user on one map. You seslect the map
with the combobox "Map".
One
choice in the contacts combobox is called "All". It means that
you can see the position of all the user on one map. You seslect the map
with the combobox "Map".
You can click on a point to get the contact's ID, nickname, and email address if you have ethe authorization.
A green point ![]() means that you can see the contact information. A red point
means that you can see the contact information. A red point ![]() means that you cannot see the contact information, it is an anonymous
user. It is just here to show you for example that this room is already
occupied by someone. The blue point
means that you cannot see the contact information, it is an anonymous
user. It is just here to show you for example that this room is already
occupied by someone. The blue point ![]() is your position, you might be lost in the school ;-).
is your position, you might be lost in the school ;-).